How to Shorten a Flared Sleeve
Have you ever shortened the length of you pattern - ie trouser leg, sleeve or hem, and then had difficulty when coming to sew your hem? Did you feel like there was just too much fabric and the hem bunched somewhat?
It's a pretty common problem, but also a super easy one to fix. It occurs when you have a flared pattern piece, such as the sleeve for the Array Top/Dress

Having just sewn an Array Top and shortened the sleeves to turn it into an oversized boxy tee - I thought it would be good to share how to shorten the sleeves without getting into trouble when you come to stitch the hems.
This tutorial is suitable for when you want to have a deep(ish) hem. If you simply want to hem using a scant or rolled hem, then you won't need to bother with this pattern adjustment.
I have used a (roughly to) scale pattern piece to illustrate the principals here - you'll obviously have to make the changes on your full sized pattern piece. Perhaps you might want to trace it off first? (We stock dressmakers tracing paper if you need some)
Below is photo tutorial, otherwise - you can check out the video here.
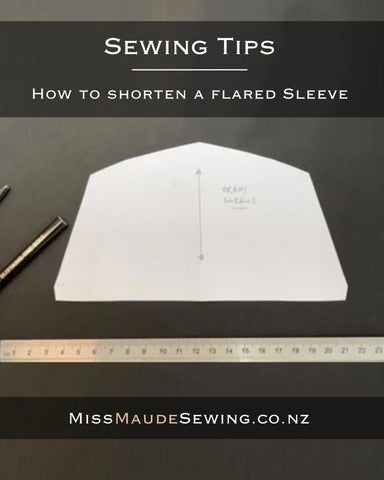
1. This is what your sleeve pattern will look like before you make any adjustments
2. Mark a foldline where you want your finished sleeve to end
3. Mark a second line below your finished length line - the distance between the two is the depth of your hem. (often between 1cm - 6cm, depending on style preference)
4. If you are going to finish the inside of your hem by turning the raw edge under, mark a third line the depth of your raw edge turn-under. If you are planning on finishing your raw hem edge with an overlock or zig zag, you can skip this step
5. Your pattern piece will now look something like this
6. Cut off your pattern at the lowest line you've just drawn.
7. Fold up your hem on each of the lines just marked. Your pattern piece should now look like this: 8. Here you can see that if this was your final pattern piece, there would be excess fabric on either side of your sleeve. If you were to stitch your hem like this, you'd have to try and ease (or more likely bunch) this excess fabric into the hem.
9. Cut off the excess on each side of the pattern, following the line of the sleeve as in the image:
10. Unfold, and you have your finished pattern piece. 
SAVE IT FOR LATER....